Board and batten in entry DIY
By The Style Sisters - Thursday, January 28, 2016
So.... I convinced my sweet hubby to help me put up board and batten in our entryway last weekend (which really means him figuring it out and cutting all the boards, nailing them to the wall and me assisting him by holding the wood, filling holes, sanding and painting) we make a great team!
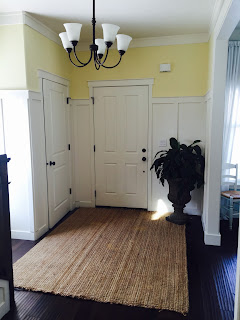
I am amazed to see the difference!
It makes our entry feel bigger and taller.
Here is the before- painted walls with no board and batten
In this entryway there are so many small walls so we had to ask a lot of questions before we started..... Here are just a few-
How do we handle the inside corners? We decided to put a strip inside to make a clean look.
Do we put boards on the one and only outside corner in the room? Yes we decided to put them on the outside to give it a nice finished look.
We could've ignored both the inside and outside corners and just spaced the boards to avoid those areas but we liked the finish look.
What do we do at the bottom where the batten boards meets the baseboard because batten board is thicker than the baseboard? Well in the first area.... where we started we kept them straight then in the other areas we angled the bottom of the boards. After it is all said and done I think I liked the straight edge better. But it still looks great.
What about the electrical outlets and light switches... how do we handle that area? We simply cut the board into two sections one to sit above the outlet and one to sit below the outlet.
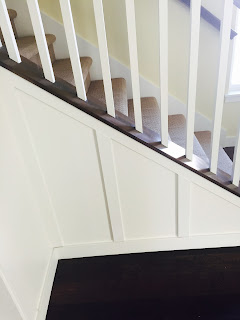
What about under the stairs? We decided to add strips and it looks so nice!
We had many unusual wall areas and it was a little tricky but it really turned out great.
Let me tell you the biggest tip- GET A NAIL GUN! OH my gosh what a difference that made! We started by hammering in the nails by hand and it was a beast because of all the angles. So we borrowed the nail gun and the compressor and bada boom
So. Much. Faster.!!
Once all the boards are up it is time to set the nails, fill the nail holes, caulk and paint
It was so worth the effort!
Have any of you tried adding board and batten to your walls? What tips or tricks did you use?


7 Comments
It looks really pretty. xoxo Su
ReplyDeleteThank you Butterfly 8 it took some effort and some thinking to figure out how to address all those walls but I really love it! Thank you taking time to check out my post and to leave a comment! It means a lot :)
DeleteLove it. The new board and batten really brightens up the space and gives it a new life.
ReplyDeleteThanks Jennifer... I feel the same way!! Now im thinking of more rooms to do this to! But first I might put rope around my light fixture to change that up a bit. I'll post that when I figure out how to do it. Thank you for stopping by and saying hi! Hugs, Karin
DeleteOh how beautiful it looks, great job...
ReplyDeleteSmiles~
Mari
Mari... Thank you so much for your kind comment... We really love how it looks every time we walk past it... It just brings a smile to our faces! Thanks again for stopping by!
DeleteKarin :)
I really enjoyed reading about your DIY board and batten project for the entryway! Your step-by-step guide is incredibly helpful, and the final result is stunning. The way you incorporated the board and batten adds so much character and dimension to the space. I also appreciate the tips you provided for achieving a clean finish—those little details can make all the difference!
ReplyDeleteAs someone who enjoys home improvement projects, I’m curious about the electrical considerations you had to keep in mind during the installation. Did you have to move or adjust any outlets or light switches? I imagine ensuring everything is properly positioned with the new design could be quite a challenge. I’d love to hear how you navigated that aspect of your project!
Comments